Friday, May 3, 2013

Redefine Block on Tool Palettes

If the block definition changes is insert by Tool Palettes, it does not affect the same block in the Tool Palettes
To update the block definition in Tool Palettes to match the block in the drawing


Right-click on the block > Redefine

Open Block by Block Editor

If a block open in Tool Palettes by Block Editor, any changes make and saved will automatically update in both Tool Palettes and active drawing

Thursday, May 2, 2013

Template

Control the standards of the drawing
  1. Setup Units
  2. Create Annotation Styles
  3. Create Layers
  4. Create Page Setup
  5. Insert Title Block
  6. Save as Template

Setup Units

Input UN to start the units command


Set the Precision for the project

Create Annotation Styles

Text Styles
Home tab > Annotation panel > Text Style

Click New
 
Styles: 3.5 Gen Note
Font: Tahoma
Height: 3.50

Styles: Label
Font: Verdana
Height: 6.00

Styles: Single Line Text
Font: Arial
Height: 0.00
Oblique Angle: 15

Styles: Mirror Text
Font: txt.shx
Height: 0.00

Dimension Styles
Home tab > Annotation panel > Dimension Style

Click New
 

New Style Name: Dim_Wall


Line tab
Baseline spacing: 20
Extend beyond dim lines: 9
Offset from origin: 9

Symbols and Arrows tab
First Arrow: Architectural tick
Arrow size: 10
Center marks: 10
Break size: 9

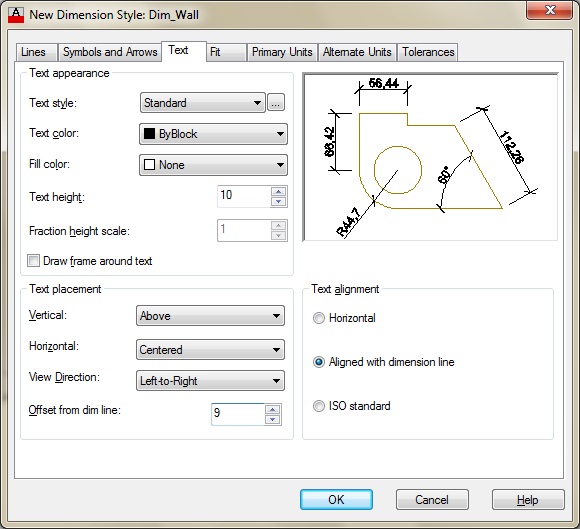
Text tab
Text Height: 10
Offset from dim line: 9

New Style Name: Dim_Furniture

Line tab
Baseline spacing: 6
Extend beyond dim lines: 2
Offset from origin: 2

Symbols and Arrows tab
First Arrow: Closed blank
Arrow size: 3
Center marks: 3
Break size: 3

Text tab
Text Height: 3
Offset from dim line: 2

Create Layers

Home tab > Layers panel > Layer Properties

Click New Layer

Hidden
Color: Red Linetype: Hidden Lineweight: 0.3

Annotation
Color: Magenta Linetype: Continuous Lineweight: 0.4

Dimension
Color: White Linetype: Continuous Lineweight: Default

Hatch
Color: 102 Linetype: Continuous Lineweight: 0.2

Object
Color: 40 Linetype: Continuous Lineweight: 0.5

Viewport
Color: Green Linetype: Continuous Lineweight: Default

Title Block
Color: White Linetype: Continuous Lineweight: 0.7

Create Page Setup

Navigate to Layout
Right-click on Layout 1 tab > Page Setup Manager
Click New
 

New page setup name: A2 Landscape

Select Printer/Plotter
Paper size: ISO A2 (594.00 x 420.00 MM)


Click Set Current to set the page setup as current


Delete the viewport

Change the current layer to Title Block
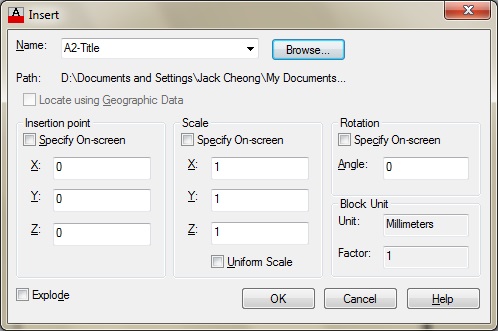
Home tab > Block panel > Insert


Click Browse to locate the title block
Insert point: 0,0,0
Scale: 1
Rotation: 0

Save As Template

Set to Model space
Set the current layer to Object
Application menu > Save As > Drawing Template


Drawing template with a file extension of *.dwt

Quick View Layout

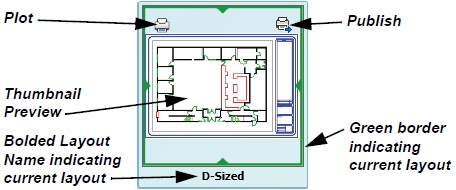
Access thumbnail views for quick switching of layouts


Status bar - Quick View Layout


Current Layout: Bolded Text, Green Border
Plot & Publish buttons

Named View - Layout

View tab > Views panel > View Manager

Click New
 

Input View name
Boundary: Select Current display or Define window to define the object or area
Settings: Check Save layer snapshot with view
 

The view save as Model View

Use Named View as Viewport - Layout

Layout tab > Layout View panel > Named
 
Select New Viewport tab


Select Standard viewports from the left pane
Click the Preview area, select the named view from "Change view to"

Clipping Viewport - Layout

Layout tab > Layout Viewports panel > Clip
 

Select viewport to clip


Drawrectangular shape to clip the viewport

Wednesday, May 1, 2013

Layer Override in Viewport - Layout

Modify layer status and properties in a viewport and not affect other viewports

Freeze Layers in Viewport

If you freeze a layer in normal way, it's invisible in all viewports
 

Select "Freeze or thaw in current viewport", layer only frozen in current viewport but not other

Override Layer Properties in Viewport

Layer properties like Color, Linetype, Lineweight, Transparency, Plot Style can be modify per viewport
 

If you change the VP Color, VP Linetype, VP Lineweight, VP Transpancy, VP Plot Style; it only affect the current viewport

If the layer properties is override, it will highlight in the layer list


Viewport Override Layer filter automatically created

 
Same layer over different viewport show different properties


Annotation Scale - Layout

Annotation Scale is connected to Viewport Scale

Annotative Objects

  1. Text
  2. Dimension
  3. Multileader
  4. Hatch
  5. Block
  6. Attribute
The above 6 objects need to be annotative in order to be seen with the different viewport scale

Annotation Scale for Text

Create Annotative Text
Home tab > Annotation panel > Text Style
 
Styles: Hand
Font Name: CityBlueprint
Size: Annotative
Paper Text Height: 8

Create Layout ISO A1 Landscape
Create 4 Equal viewport, delete the bottom 2 viewports
Set both Viewport Scale to 1:50
Double-click in the top-left corner viewport to make it current and lock it
Create Single Line Text (Sale Room, Marketing Room), make Justify to MC
 

Hover cursor over the text
 

A light-blue triangle appear to show that the text is Annotative

Select both texts, Annotate tab > Annotation Scale panel > Add/Delete Scales
 
 
Add a new scale 1:30
 

If you hover cursor again on the same text
 

2 light-blue triangle appear to show that there are 2 annotation scales with the text

Select the right viewport, change the viewport scale to 1:30
 

Objects become smaller, but the text remain the same

Annotation Scale for Dimension

Create Annotative Dimension
Home tab > Annotation panel > Dimension Style
 

Styles: Architectural
Symbols and Arrows - Arrowhead: Architectural tick
Text - Text height: 6
Fit - Scale for dimension features: Annotative
Primary Units - Precision: 0


Create a Linear dimension
The Dim Text height at 6

Model Text Height

Select the annotative text
 

Model text height = Annotative scale x Paper text height

Text Style - Annotation

Control the appearance of the text display in the drawing
Home tab > Annotation panel > Text Style
 

Annotate tab > Text - Small Arrow - Text Style

 
Styles
There are 2 default text styles - Annotative, Standard (You can create any new text style)

Font Name
Truetype Font (*.ttf): Install in Windows by Microsoft programs
Shape Font (*.shx): Created by AutoCAD (for Mirror Text)

Size
Height: 0.00 by default
 (for metric drawing, the text height preset at 2.5 if the value is 0)
Text height of Standard text style must remain at 0.00 at all time
Dimension Styles are using the Standard text style by default
If you change the Standard text style to any value other than 0, it will lock the dimension text height

Oblique Angle
Control the angle (0 ~ 85) of Single Line Text

Dimension Style - Annotation

Control the display of dimension, including dimension Text, Dimension line, Extension line, Arrowhead

Home tab > Annotation panel > Dimension Style


Annotate tab > Dimension panel - Small Arrow - Dimension Style


You can create New dimension style, Modify, Override or Compare the dimension styles

Line tab


Dimension Lines
Color, Linetype, Lineweight all set By Block
Dimension lines divided by 2 parts: Dim line 1, Dim line 2, it act like a block

Extension Lines
Color, Linetype 1, Linetype 2, Lineweight all set By Block
2 extension lines act like a block

Extend beyond dim lines
Depend of the object size (min 3% of the object size)

Offset from origin
Depend of the object size (min 3% of the object size)

Fixed length extension lines
Fix all extension lines to the same length

Symbols and Arrows

Arrowhead
Select preset arrowhead from the list or block created within the drawing
When you select the 1st arrowhead, the 2nd arrowhead will follow the same
Leader's arrowheads are independent from the other

Arrow size
Depend of the object size (min 3% of the object size)

Center marks
Mark: Cross Mark
Line: Cross Mark @ center, and 4  lines @ the quadrant
Affect on new dimension only
Dimension Break
Break size: Depend of the object size (min 3% of the object size)
Arc length symbol
Place it beside or above the dim text, or none

Radius jog dimension
Jog angle: From 5 ~ 90
Affect on new dimension only
Linear jog dimension
Jog height factor: 1.5 times of dim text height

Text tab


Text appearance
Text style: Standard by default (you can select from the text list which linked to the Text Style dialog box)
Text color: ByBlock (dimension act like a block)
Fill color: None by default
Background: Fill color follow the background of drawing setting
Text height: Depend of the object size (min 3% of the object size)

Text placement
Offset from dim line: Depend of the object size (min 3% of the object size)

Text alignment
ISO standard: Aligns it horizontally when text is outside the extension lines